
A few weeks ago we published an article about our magnificent 3D printing farm. Some of you may have asked a question, “How hard can it be to maintain 300 printers running virtually 24/7?”
The answer is rather simple, as the single best way how to keep any 3D printer running all the time is to provide it with routine care. Therefore, we would like to share some tips and tricks which will lengthen the life of your 3D printer.
1. Check axis movement
Movement of the axis is crucial. Without a proper movement, you are simply not able to print anything. It might be quite difficult to tell what is a normal movement and what starts to look a bit suspicious. Therefore, you can start by checking the 5 most common sources of axis movement problems:
- Dirty smooth rods – Over time the smooth rods might become quite dirty. Clean them with a paper towel and apply a little bit of general purpose machine oil . Then just move the axis back and forth a couple of times. This cleans the dirt and increases longevity.
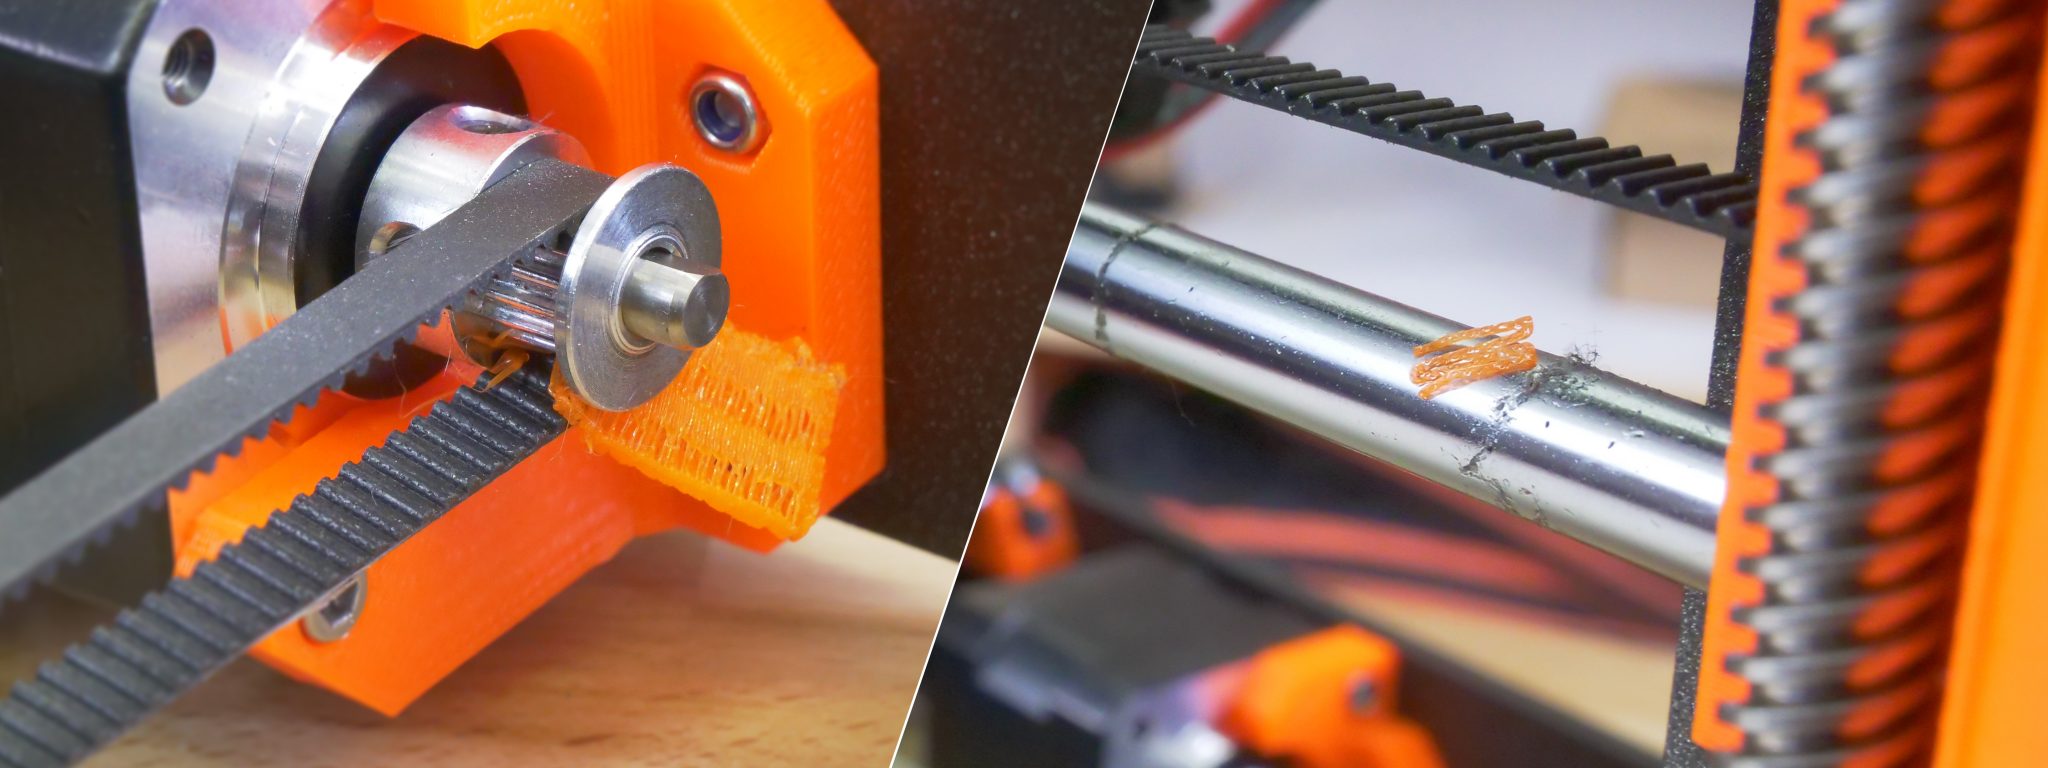
- Debris around the Y-axis pulley – The 3D printing process may be accompanied by the production of plastic debris, such as supports, which will be falling around the printer. Make sure none of it will get between the Y-axis belt and the Y-axis pulley, as it might jam the Y-axis (heatbed) movement.
- Loose X or Y axis motor shaft pulleys – Motor shaft pulleys must be secured to the X or Y motor shaft. Otherwise, the motor itself will not be able to move with the axis. Simply check that both of the small black screws are fully tightened in both of the pulleys.
- Loose X or Y axis belt – Both of the belts should be tight enough to sound like a low bass note when plucked. It is quite tricky to find the sweet spot. However, once you manage to find it, you will not have to re-tighten the belts anymore.
- Jammed linear bearings – This usually happens after hundreds of printing hours. You should be able to spot that the axis is not running smoothly anymore. If that’s the case, then the affected bearings should be removed and greased on the inside (they need to be removed from axis because the plastic lip will prevent the grease from getting inside). Super-lube, or any other multi-purpose grease, will do.
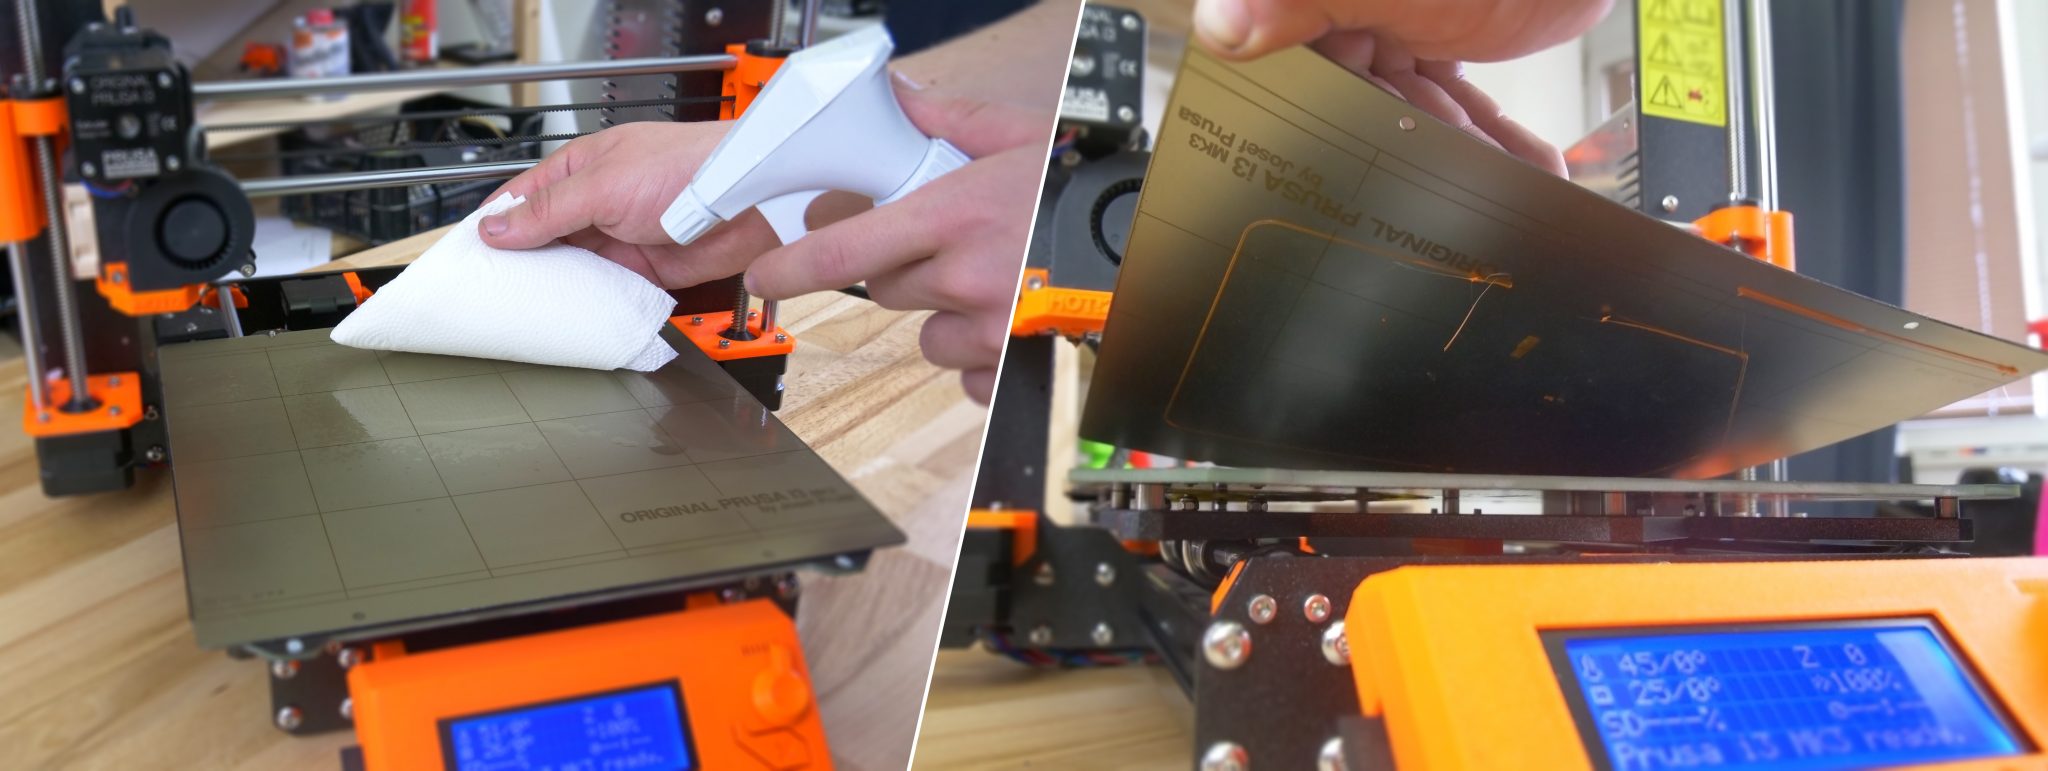
2. Keep the print surface clean
Having the print surface clean is vital for the extruded plastic to stick nicely. Gently wipe the surface with rubbing alcohol solution containing at least 90% isopropyl alcohol (IPA). Alternatively, use window cleaner (such as Windex) before every print.
Once you suspect that none of these two is having any effect and your prints do not stick, then use ACETONE. It removes the grease better than IPA or Windex and rejuvenates the PEI print surface. However, do not use ACETONE daily, PEI would become brittle and start cracking. The non-sticking print surface is mostly caused by moisturizing hand creams with silicone. So before you start cleaning the print surface, clean your hands first! 🙂
If even the ACETONE does not rejuvenate the surface, then we have one last trick. Use a little bit of dish soap with water, then just dry the surface with a paper towel and use IPA again. Unlike the suggested IPA, Windex or ACETON, dish soap is able to dissolve sugar residue, which might be ever so slightly present on the surface, preventing the plastic to stick perfectly.
When you are using our brand new steel sheets (Original Prusa i3 MK2.5 and MK3 owners), bear in mind that if you leave one of the sides dirty, it might compromise the Mesh bed leveling before the print.
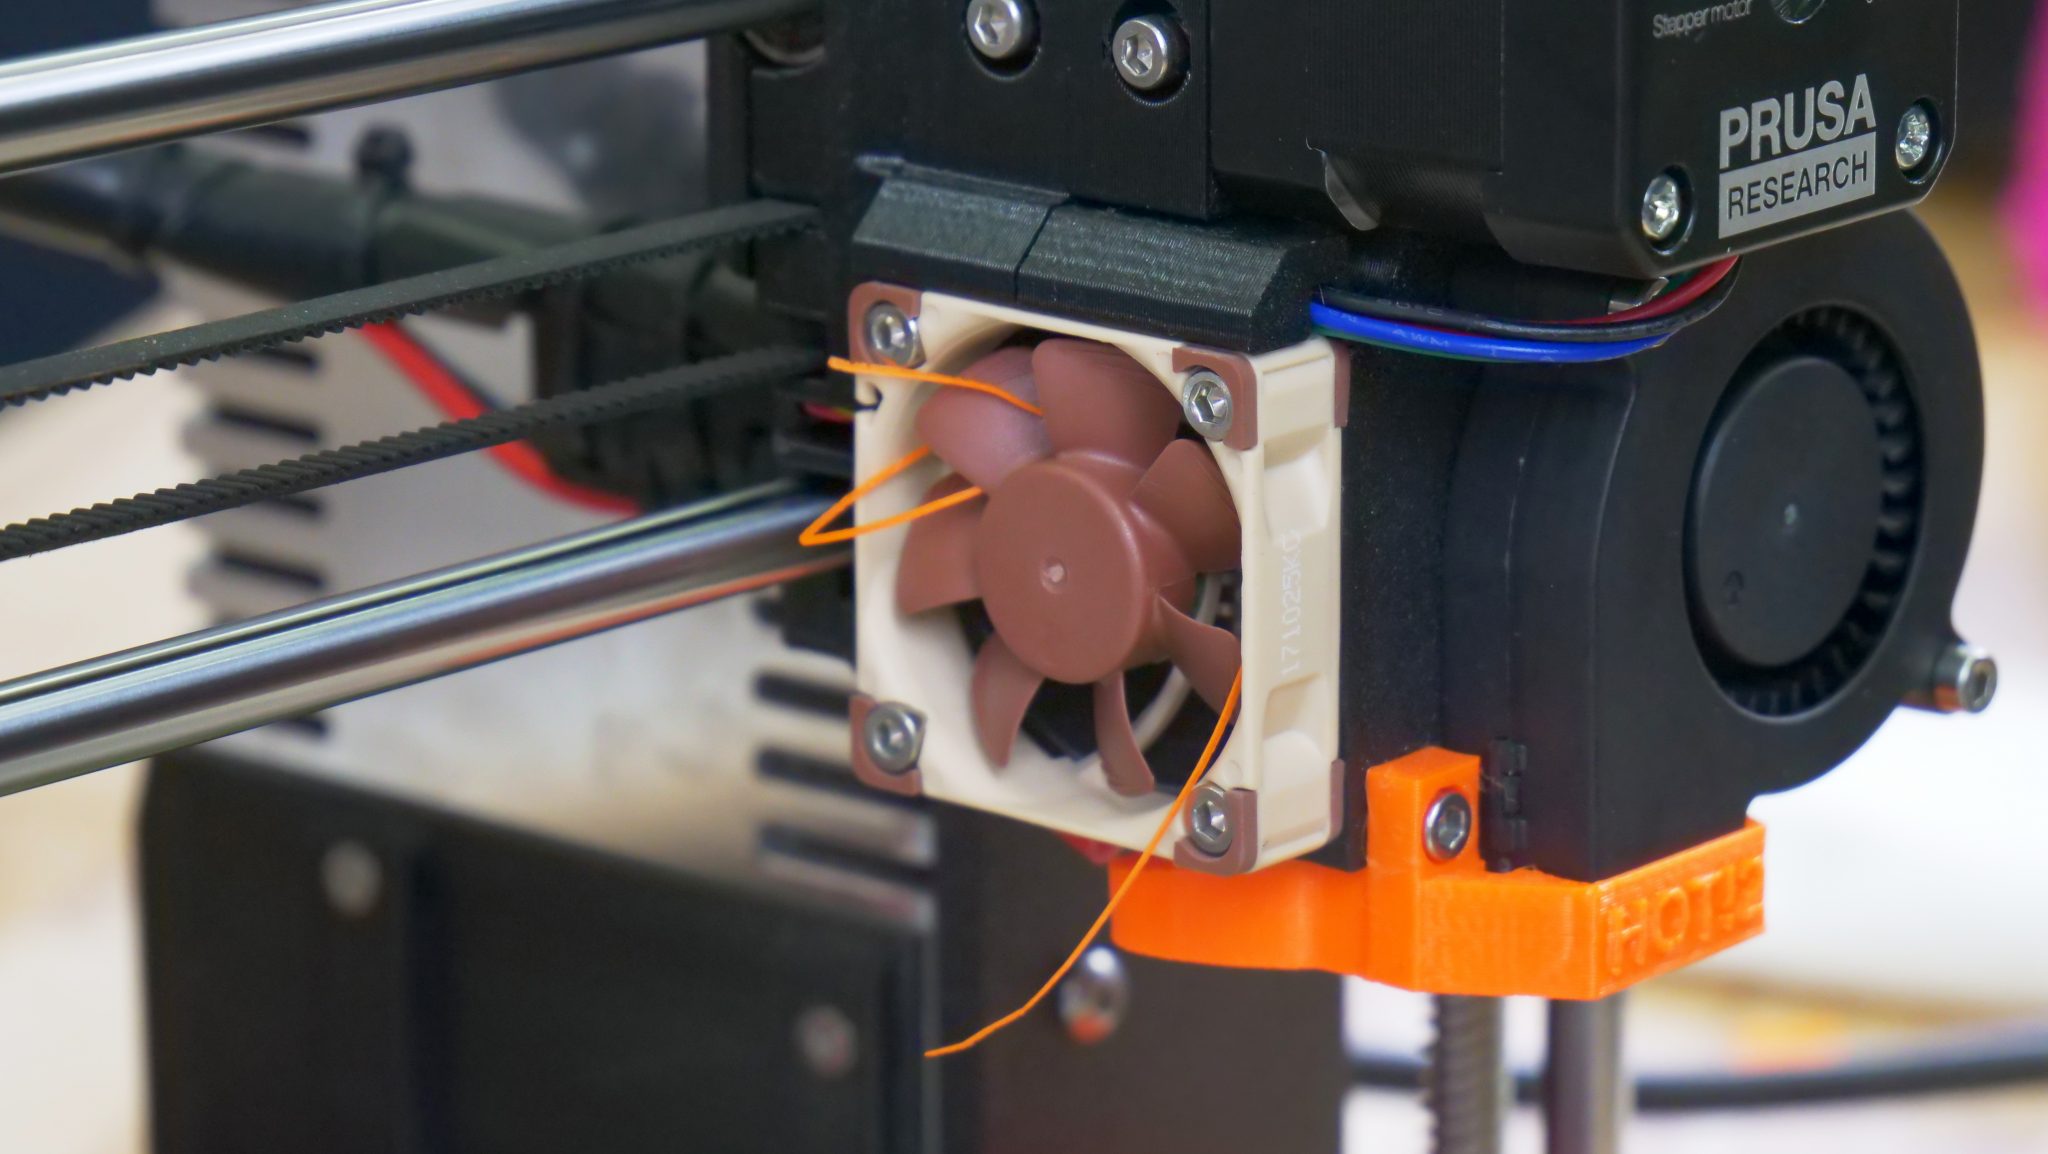
3. Check both of your fans
The fans keep the heating components from getting too hot and also ensure that the extruded plastic is properly cooled. Therefore, visually check if there is no debris inside the fan preventing it from spinning. In case there is any visual debris inside the fans, pull it out using tweezers. Then hold the fan with your hand to keep it from spinning while you blow at it with a compressed air spray to clear the dust. This will prevent the fan blades from getting damaged during the process.
Original Prusa i3 MK3 can spot if any of the fans stop spinning. However, that does not mean you should forget about them.
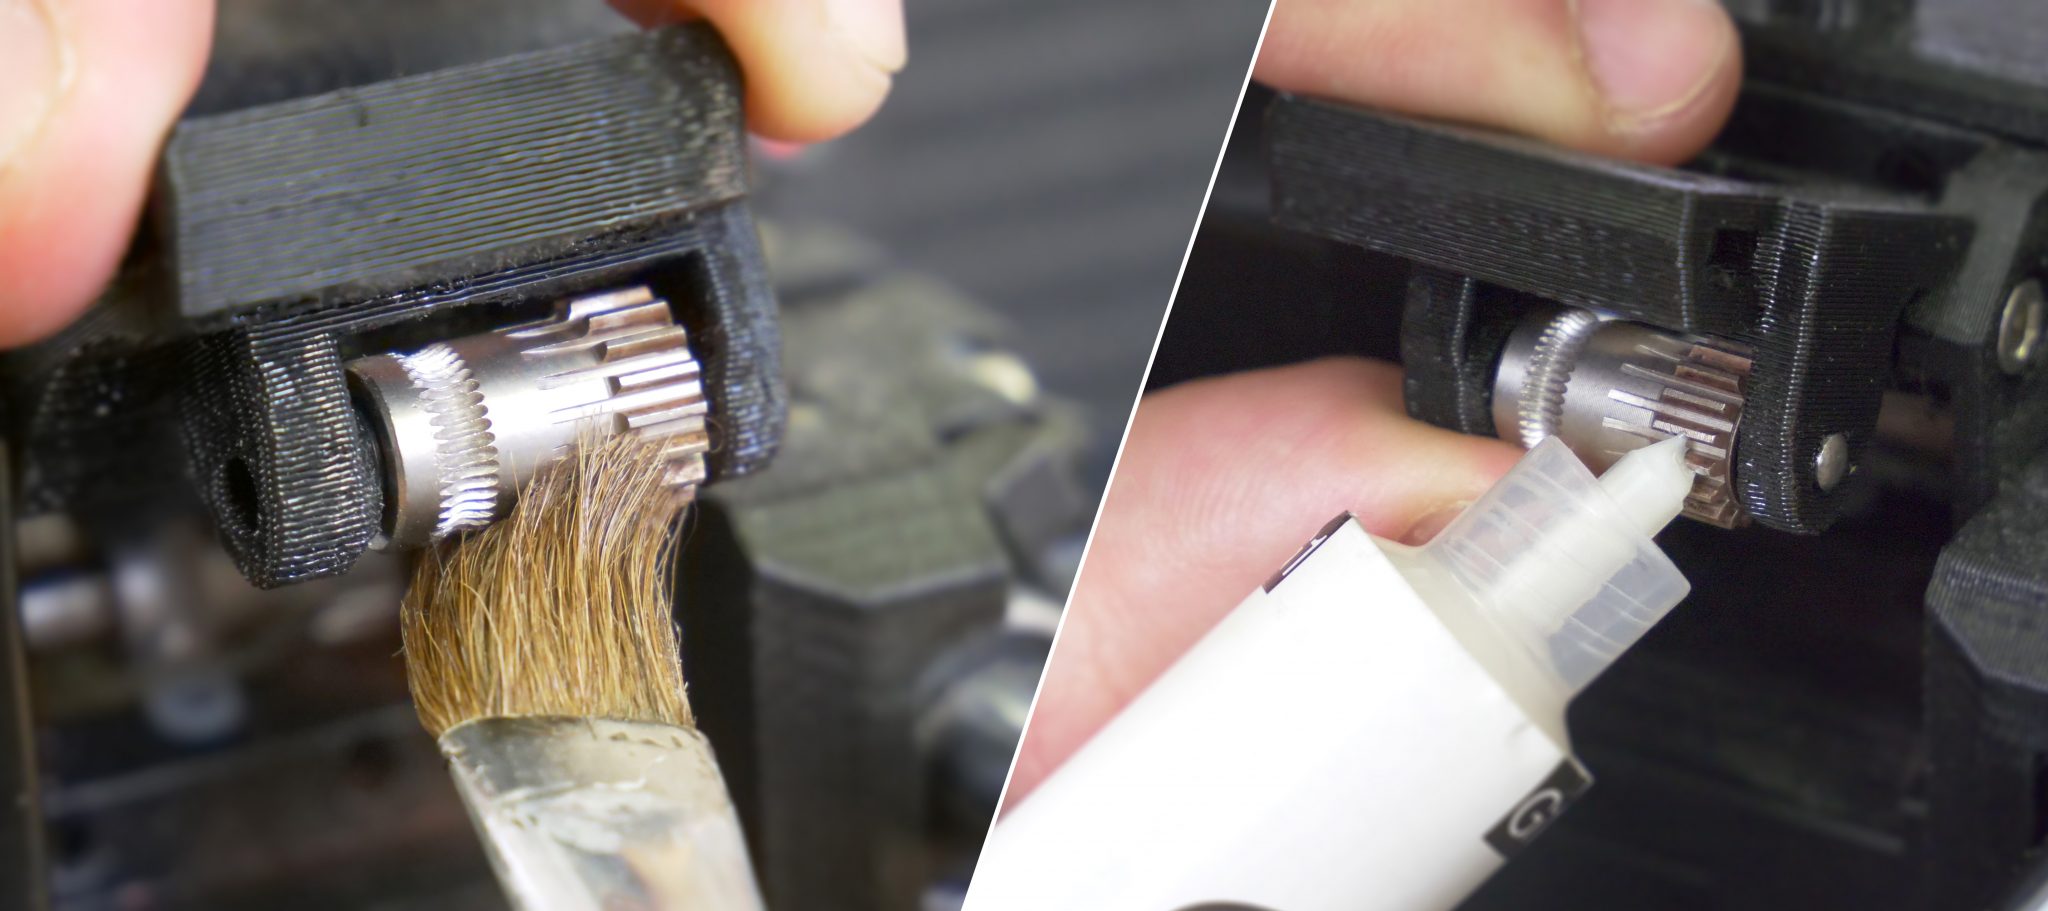
4. Make sure extruder gear moves freely
Extruder gear might get jammed with plastic debris after some time, especially if you print daily. To prevent it, just routinely check that it can feed the filament inside and spin freely. Also, check the extruder gear each time you hear a “click” noise coming out of the extruder while loading in a new filament.
Extruder gears might be producing unpleasant squeaking noises. That is usually caused by filament dust, which is quite easy to clear. Other causes of unwanted noises can be a misaligned pulley shaft or an overtightened extruder idler.
Original Prusa i3 MK2.5 and MK3 owners shall also apply lithium based grease onto the Bondtech extruder gears meshing. If you do not do that, rusted dust might appear around the extruder gears. Good news is that the Bondtech gears themselves are not damaged. Clear the rust with a brush, use the lithium grease and it will not appear again. You can buy lithium grease from Amazon.com, Ebay.com, Conrad.de or your local supplier.
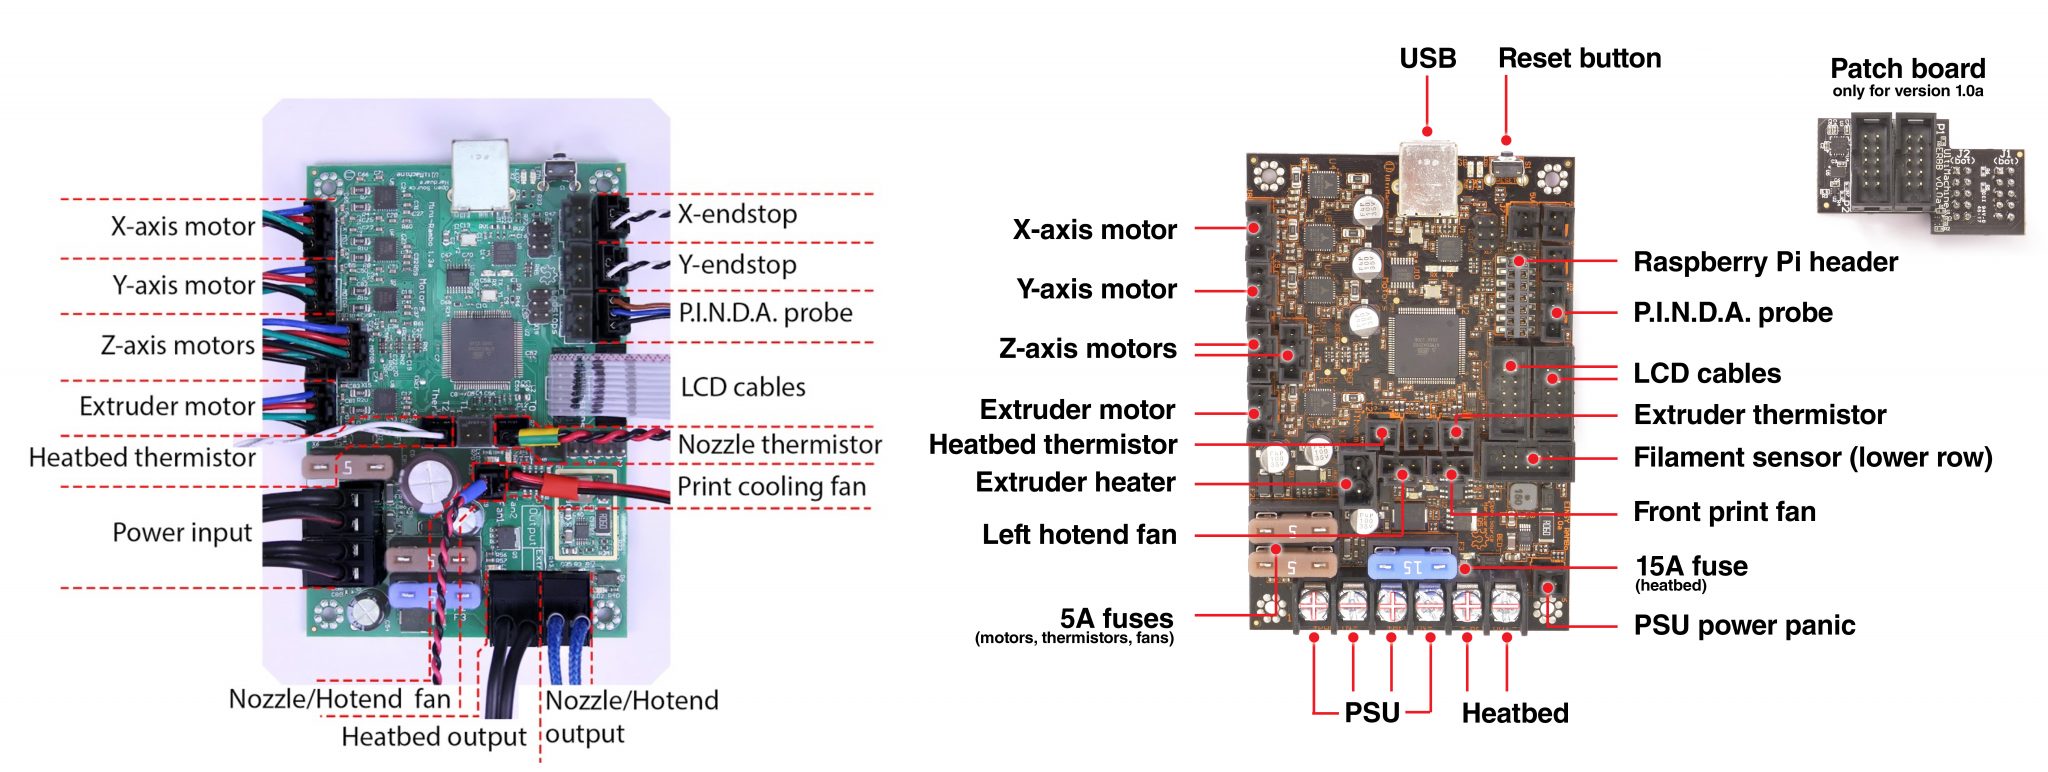
5. Check electrical connectors
It is a good practice to check and eventually reconnect all electrical connectors on the EINSY or mini RAMBo board as connectors might get loose over time. That usually happens if the connectors were not plugged into the board properly in the first place.
Before you start reconnecting any of the connectors, make sure to turn the printer off and unplug it from the power source.
- Owners of the Original Prusa i3 MK2/S/2.5 shall reseat all of the connectors, especially make sure that the Power input and Heatbed output connectors are perfectly plugged in, this way you will prevent any inconvenient damage.
- Original Prusa i3 MK3 owners shall just try to pull the PSU and Heatbed cables. If you feel that they are firmly attached, then everything is perfectly fine. If you feel a bit of movement, then just re-tightened the bolts. Other than that, make sure that other connectors are fully seated on the board.
Also, when you are checking the connectors, you can also clear the board from dust. Simply use a computer cleaner spray which will blow the dust out of the electronics board. Blow at the board from a reasonable distance, so that you don’t damage any of the components.
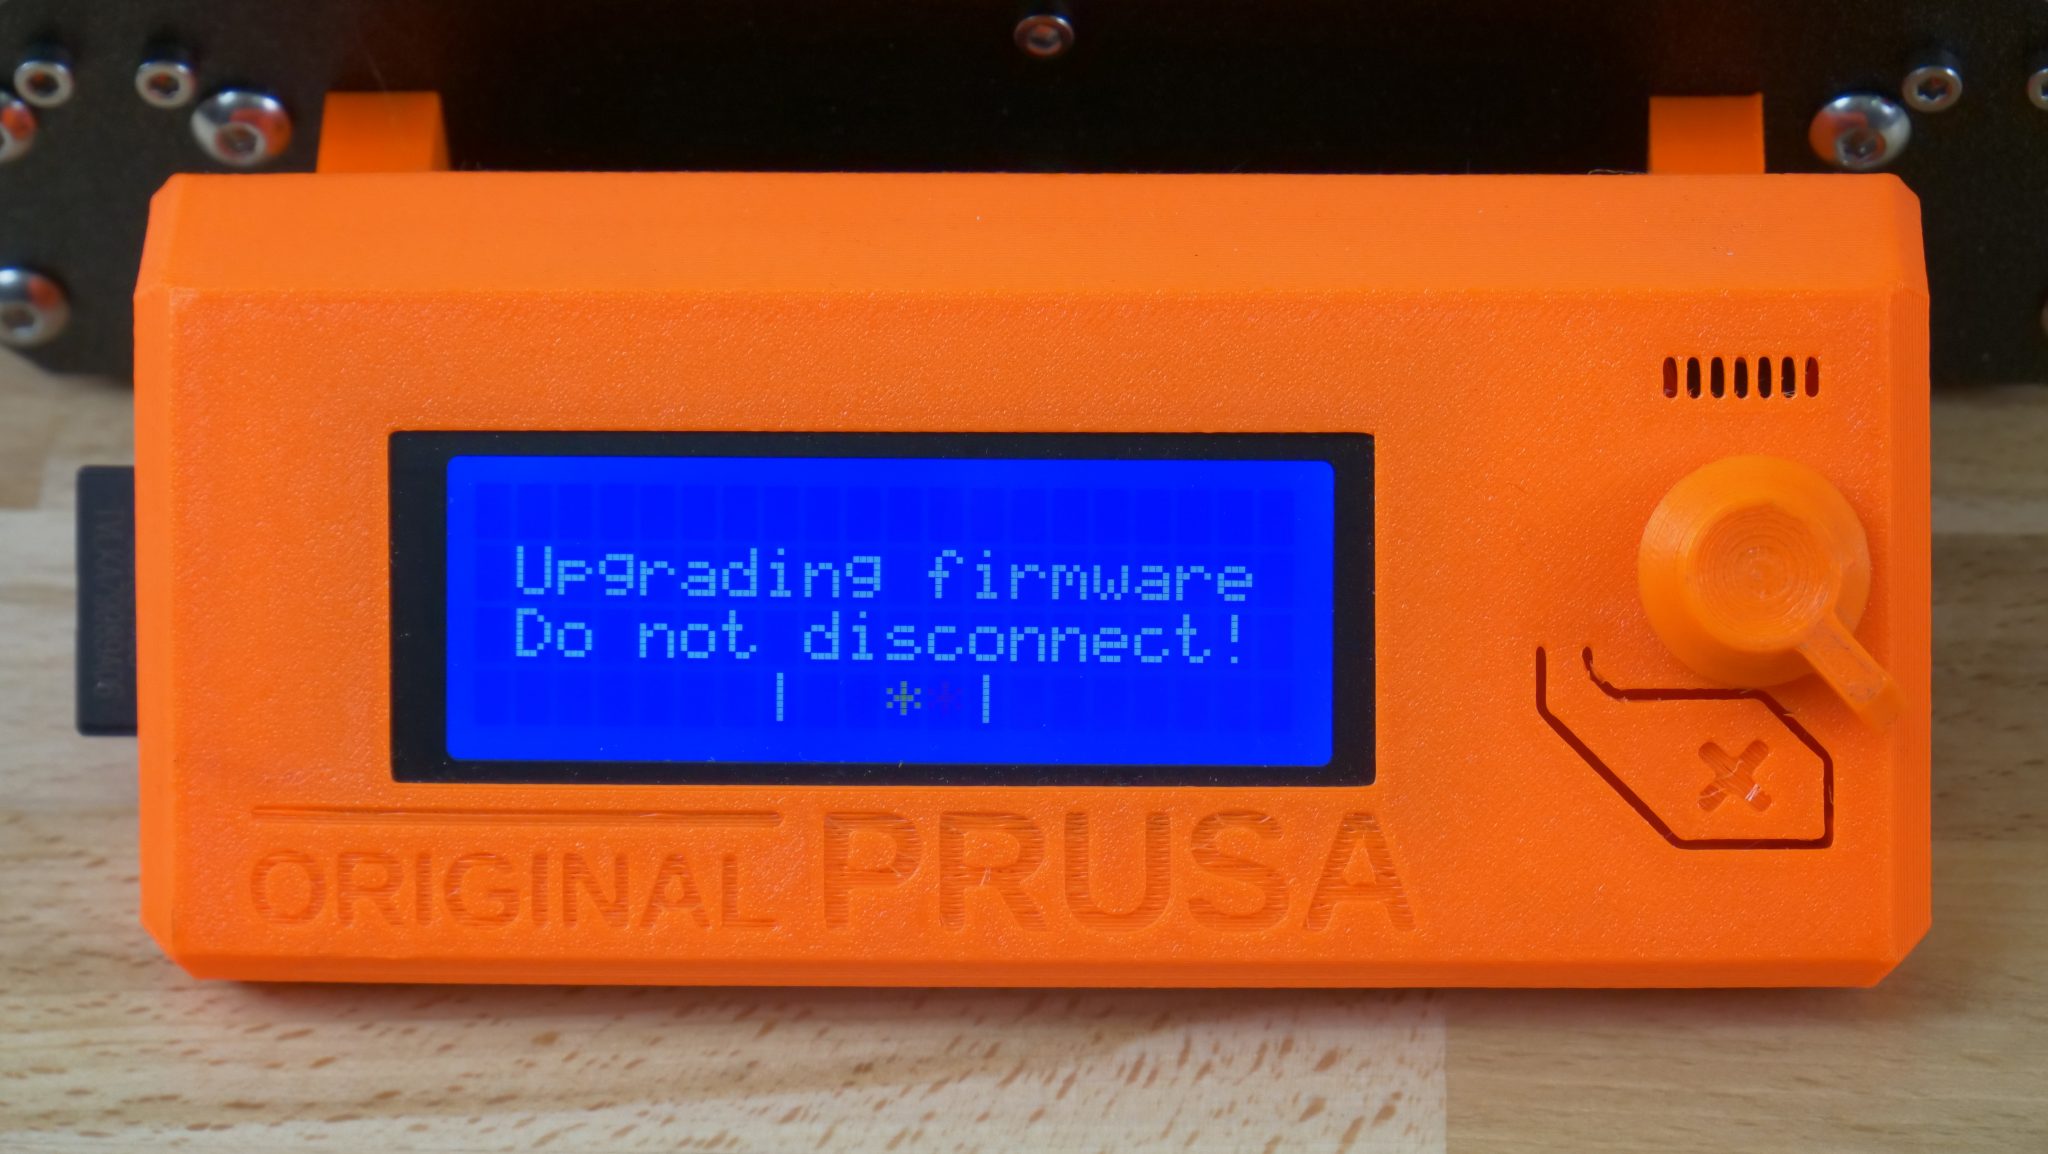
6. Keep your printer updated
Always try to keep your 3D printer’s firmware up to date. Newer firmware versions introduce new features, enhance the print quality, fix older bugs, and make your printer run a bit more smoothly.
You can find the latest firmware releases at prusa3d.com/drivers. Actual firmware version running on your printer can be found in the LCD menu – support – Firmware [version] and a complete guide on how to update the firmware can be found at Firmware updating and flashing.
From our experience, these are the most important checks you shall do at least once in a while. All of our “farmers” are doing some of these routines daily.
You can check out our Knowledge Base for more 3D printing tips and tricks.
I just posted a comment on the 6 tips article. I intentionally did not click the Post to Facebook box. In spite of that the posting shows my family photo from Facebook. Clearly you are sharing my information with them. If I knew that I would never have commented. Even if normal for Facebook this is unacceptable on your part. Remedial action is required.
There are two ways to comment on our articles. You chose the embedded facebook comments, so your profile picture is displayed, there is nothing we can do about it, these are handled by facebook.
That’s why we also offer an alternative way to comment, where only your name (or nickname) will be displayed, you’ll find it just under the facebook comment section.
Any suggestions for maintaining the Z-axis rods? For example cleaning them and maybe using that same lithium grease?
If you are going to buy the 3D printer then go for the online consultant, there are many online help services available where you can consult about printers and get the idea about the best quality of #d printers and you can choose the best printer which offers you the best quality.
Does Prusa have a maintenance schedule for replacement of consumable parts such as belts, bearings, nozzles, powder coated sheets, etc.? Also, how long do machines run in the print farm before getting retired or completely rebuilt?
I’ve used PlanetSafe Lubricants for grease and lubricant on the bearings. Works really well. And it is non-toxic and doesn’t stink. Worked much better than Super Lube for me.
Thanks for sharing this post with us. These maintenance tips are so useful for the consumers and save money in future. I use these tips as well at my office NSFW tiktok you could visit there for more details